Hot ImagesHot ImagesHot ImagesHot ImagesHot Images

August 5, 2012

Block stitch and Interlocking block stitch

Block stitch seems to be a favourite on the rounds of Crochet blog land and interlocking block stitch has popped up in the Lets get Crafting Knitting and crochet magazine.

BLOCK STITCH
is an easy and quick stitch to do,
alternate rows of 3dc and chain stitch loops to take the next row of 'dc block'
I like the effect and the speed of this stitch

INTERLOCKING BLOCK STITCH.....
as shown in clutch bag design in the Lets Get Crafting magazine. Page 40/41

INTERLOCKING BLOCK STITCH as shown in the magazine
who sorted me out with the easy and I'm sure correct method.
From Goose on Let's get Crafting, so much easier to do slightly bumpy edge and a slightly staggered check but sooooooooooo much easier and quicker to do
You just crochet over the chain stitches when you do the trebles hey presto an easy stitch to do.
instead of doing separate rows you just do the trebles over the chain first row encasing them in the trebles it looks wavy to start with but evens out as it grows and the checks aren't quite side by side but works for me and wow! is it quicker and simpler to do.
Thanks Goose.click link to see thread
But on further research is this not brick stitch?
oh! hell who cares it's a lovely stitch and easier to do, adding it to my library of favourite stitches

My OLD METHOD OF INTERLOCKING BLOCK STITCH
one I won't be using again as Goose's Method is far far easier to do but leaving the pictures just in case you want to try the hard version lol

Start with a base chain or even a base chain and sc row.

Each row is in two parts. 1&2make the complete first row and they can be split at the end of doing them
 flat together ready for row 3

row 3 joins them together, then you do row 4 the second half of the completed checks of the second row
3&4 rows can also be open
Row 5 joins then together and so on

Then you turn it over to start row 6...
and fill in the holes or checks. the second half of each row is sort of worked through the hole and joins the chain 3 and the trebles together and makes for a really firm and substantial fabric, great stitch if you don't mind the slowness of the growth
Hope the picture help you understand the stitch.
My little sample, I started to make the clutch bag but decided it was too slow for me so a sample is all I have
the bag is quite cute though and done as checks with only 3 colours, I went for a multi colour look.
Have a fun filled Sunday...off to dig up the back lawn lol
Hugs to all xx


UPDATE: September 24th 2012
I am only mentioning this because it is my picture that is popping up every where on Google incorrectly as several other stitches because of a comment on PINTREST.

Some one thinks this stitch can be called brick stitch, mosaic stitch and Chocolate box it is none of these at all. It is BLOCK STITCH, in fact Chocolate box is motif not a stitch 

I will be doing a sample of the other two stitches asap. so you can see the difference right now I have a couple more sample square to add to the book, which I am QUITE EXCITED about as I have been sent a few sample pages and they look great, they are off to the 
Frankfurt Book Fair 10-14th OCTOBER
Good Luck GMC with the fair
Happy hooking all x

UPDATE: 16TH FEB 2013
SINCE DOING THIS POT IT HAS BEEN LOOKED AT ALMOST 21,000 TIMES...WOW!!!!!!!!
Posts
EntryPageviews
20732
3322
21 Feb 2012, 11 comments
2888
20 Jul 2012, 10 comments
1485
21 Jul 2012, 6 comments
1446
4 Aug 2012, 9 comments
1348
1281
1114
20 May 2012, 9 comments
957
817

August 4, 2012

Fair Isle Mandala Pattern part 2

Wonderful to hear so many are giving the FI Mandala a go.

FI Mandala Pattern PART 2
4mm hook, cotton yarn, USA terms.
another mistake i missed out round 14 sorry all x
ROUND 14: looks like i didn't take a picture for round 14 but same picture to explain same as round 15 picture...sorry yet again and thanks Dee for pointing it out another ooops! 
Round 14: 3sc in first 3 sts, dc post st into dc of 2 rounds down (as picture below)
 all thought that has the start of round 15 as well sorry yet again for missing out round 14
Notes to help:
not an increase round just a replacement round (96 sts)

Round 15: in the same colour as round 14, sc in every stitch. (96sts)

Round 16: sc and dc post stitch in alternate stitches (96sts)
Notes to help:
Post stitch is Not an increase round just a replacement st.
Attach yarn as picture below lining up to do a dc post st into the first of the visible sc of 3 rounds below
Round 17: In the same colour as round 16, 1dc, 1dc, 2dc in 3rd st, repeat all the way around (128 sts)
Notes to help:
This is an increase round 
Keep checking the count of 1,1,2 I did this round three times because I missed the sequence, but it was in the early hours because I couldn't sleep..lol 

Round 18: sc in every stitch ( 128 sts)
Round 19:
Notes to help:  
Attach yarn and line up the first post st with the sc of 3 rounds down as picture below
Bit of an odd round mostly a replacement post sts but every 8th post stitch you do an increase by including the sc stitch that would be behind the post st, if you don't add this increase the posts will not line up, but start to lean 
1sc, 1sc, 1tr post st, to sc of 3 rounds down, repeat but increase every 8th post st. (total of 144sts)
Round 20: dc in every st (144sts)
Round 21: sc in every sts (144sts)

Round 22: 1sc, 1sc, 1tr post sts in 3rd st, no increase just a replacement st
Note to help:
Not an increase round.
line up the post st to match the 1st sc of 3 rounds below.
as picture below
(total sts: 48post sts, and 96sc, total of 144sts)

Round 23:  dc in every sts (144sts)
Round 24: sc in every sts (144sts)

THE END
well almost, the shell edging is done to join the front to the back

Back pattern part 3 on Monday
Have fun and really look forward to seeing how you get on
Already a couple of you lovelies have had a problem with round 5! oops my mistake and only just noticed it thanks for pointing it out Sandra and Dee there should be a ch between the groups of 4 on round 5
just check the hand written notes and amended the pattern part 1
My apologise to you both xx

HAVE FUN EVERY ONE 
xx
Hugs to all 


August 3, 2012

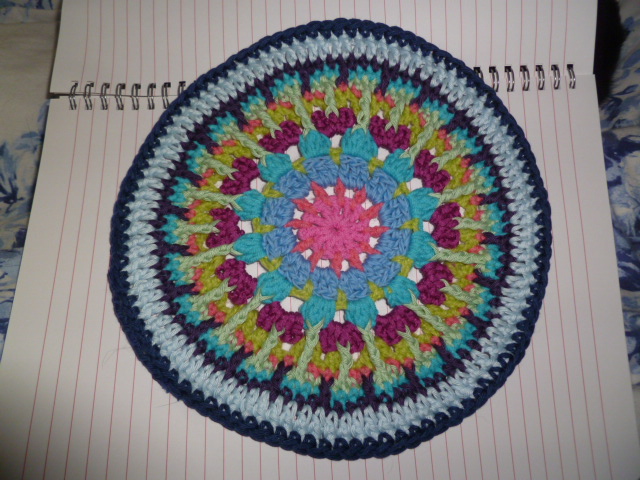
Fair Isle Mandala Pattern and pictures

As promised the Mandala Pattern
Before I start, there is a couple of things you need to know when working POST STITCH in the round,
SOME TIMES I have used the post stitch as an increase stitch but mostly it is a replacement stitch.

4mm hook and Cotton DK. USA terms.

The pattern is quite long and detailed, so I am splitting it into three posts today and tomorrow for the front and the back on Monday.

Shout if you need any help and let me know if I written something that doesn't make sense .
I had run out of some colours so used a replacement from the original Blue and Green one
Fair Isle Mandala Pattern
Chain 4 and sl st into a circle
Round 1: 12dc into the circle, sl st to complete round
Round 2: 1dc in every space with 1ch between each.  (24 sts)

Round 3: 3dc, in each space, sl st to complete. (36 sts)

Round 4: sc in first space, ch3,sc into second space, repeat to complete round sl st to finish (12 chain loops)
attach yarn in spoke space as picture above


Round 5: 4dc in each chain loop with a chain between OOPS! MY APOLOGIES YOU ARE RIGHT THERE SHOULD BE A CHAIN BETWEEN HERE
Round 6: 5dc in each space 2ch between
Round 7: 3dc in each space and 3dc in 3rd dc of the round before

Round 8: sc in every stitch (72 sts)

Round 9: Attach yarn one stitch away from the space in 2 rounds below as picture below
do 1sc in 2 more stitches (3total)
1st tr post stitch (2yo, 3 pull though's) 
into the middle dc 3 rounds down
complete the dc (2yo, 3 pull though's)
this round is an increase round so don't miss the sc stitch behind the post, do 1sc in next 3 sts, (including the one behind the post st)
The next post st is a tr post st (3yo, 4 pull through's) though 2 posts, ( middle 2dc of 4 rounds down
repeat this pattern to complete the round (96 sts)

(12dc post sts, 12tr post sts, and 72 sc) total 96 sts

Round 10: sc in every stitch (96sts) at this stage it could look a tiny bit frilly..dont worry.

Round 11: Attach yarn one stitch before the tr post st as picture below
do 3 sc, dc post st, into the first st of 2 rounds down that are visible 
as picture below
complete the dc, 
this round is NOT an increase round so the dc post st, is a replacement st, so miss the sc st, 
behind the post st, 
1sc, in next 3 stitches

repeat dc post st, in the same st of the next section and every section until the round is complete
picture below show the st that is replaced by the dc post st.
sl st to complete the round (24post sts, 3 sc between 96sts in total)
Round 12: dc in every stitch (96sts)
Round 13: sc in every stitch (96sts)
Hope you can all understand the pattern so far

TOMORROW: rounds 14 - 23 plus the shell edging.
The blog is now struggling to up load the number of picture so a perfect place to stop and continue tomorrow.
Have fun hugs to all x


August 1, 2012

I've run out of blue...

Managed 9 motifs and the purple ran out added the blue first, ran out just over 2 squares from the end of the round....although it looks a little big so I will undo the blue and take out a few stitches to see if I can make up enough to finish the round


looks quite nice on both the Purple and Teal sofas

Bit of digging today as the sun is shining here after two days of showers
I will finish the Mandala Pattern tonight and post the pattern tomorrow
Have a fun day hugs to all x


KNIT & CROCHET WITH 6 BALLS WOOL, HOOK & NEEDLES

Don't usually buy knitting and crochet magazines but FREE WOOL?...and I was interested in the quality of yarn and hook as well.
I created a new granny motif to try it all out
Very impressed, acrylic but very wool like and springy and quite pleased with how it worked up
5mm Bamboo hook was lovely, very smooth and comfy to use

This Magazine was a little bit expensive but I was definitely impressed with the yarn and hook

Mandala Pattern update: 
Hoped to post it today but got to round 8 of re-make and writing the pattern, BrupBrup wanted feeding so up I got, fed him, mean while the others all turned up so 15 minutes later I returned to the sofa and the pile of cotton and could I find my hook?....no I could not. lol
An hour LATER I was still looking for it, but really it seemed to have disappeared off the face of the earth
So I gave up and went to bed.

As I took off my clothes I could see in the mirror a line across my tummy,....laugh or what!

And I had felt myself and all pockets 3 times too. hehehe

Hugs to all xx

July 31, 2012

pheeeew!...bit of a nightmare few days

But all finished, all except a snail mail to go in this mornings post...fell ill in the week and it put me behind a bit.
Finished this morning


MANDALA PATTERN...asap 
First job is to write the pattern for those that want it

TIME TO PLAY HOOKY

First for this week I want to recommend a couple of yarns

I've been a big lover of JAMES C BRETT yarns for a long time but this is the first time I have used
COTTON-ON 50% Cotton 50% acrylic
Not a bad selection of colours, so soft, doesn't split when you hook it and a real pleasure to work with.


The second yarn is WENDY: PURE100% Bamboo ribbon 
Another soft, easy to use, none splitting yarn that is easy to use and gives a lovely result and an eco-fibre too

Catch up later
hugs to all x